In this guide, we’ll walk you through the steps to streamline your email login process, saving you time and hassle. Let’s get started!
Step 1: Visit Linkdata.com Open your web browser and navigate to Linkdata.com.
Step 2: Find the Webmail Section Once you’re on the Linkdata.com homepage, look for the “Your Email” section. You can usually find it in the top menu bar or on the homepage itself.
Step 3: Enter Your Email Address In the webmail section, you’ll see a prompt to enter your email address. Type in the email address associated with your webmail account, you will be redirected to the password page.
Step 4: Enter Your Password Next, enter the password for your webmail account. Make sure to double-check for any typos to ensure accuracy.
Step 5: Click “Login” After entering your email address and password, simply click on the “login” button.
Step 6: Access Your Webmail Once you’ve clicked “Sign In”, you’ll be automatically logged in to your webmail account. From here, you can access your inbox, compose emails, and manage your emails as usual.
And that’s it! You’ve successfully accessed your webmail through Linkdata.com using our streamlined login process.
Benefits of Streamlined Webmail Access:
Saves time: No need to navigate to a separate login page or remember a specific URL for your webmail provider.
Enhanced convenience: Access your email seamlessly from one central location, whether you’re at home, in the office, or on the go.
If you encounter any issues or have any questions about accessing your webmail through Linkdata.com, our support team is here to help. Simply reach out to us for assistance.
Thank you for following along with our tutorial! We hope this streamlined webmail access enhances your online experience and makes managing your emails easier than ever before. Visit linkdata.com for more support if needed.
WordPress stands as one of the most popular Content Management Systems (CMS) in the digital sphere, powering a vast array of websites ranging from personal blogs to intricate corporate sites. One of the many strengths of WordPress is its ease of installation and setup. While there are several methods to install WordPress, this guide will focus on one particular approach: installing WordPress via a ZIP file. This method is particularly useful if you’re working with a local server environment or a hosting provider that allows manual installation of WordPress.
Start by visiting the official WordPress website. Navigate to the download section and click on the “Download WordPress” button. The website will offer you the latest version of WordPress as a ZIP file. Save this file to a convenient location on your computer, as you will need to access it shortly.
Step 2: Upload the ZIP File to Your Hosting Account
Once you’ve downloaded the ZIP file, the next step is to upload it to your hosting account. You can do this through your hosting provider’s control panel. Most control panels, like cPanel, have a file manager application that allows you to upload and manage files. Use the file manager to navigate to the root directory where you want to install WordPress. This could be the root directory (often called public_html or www) or a subdirectory. Once you’re in the correct directory, upload the WordPress ZIP file you downloaded earlier.
Step 3: Extract the WordPress ZIP File
After uploading the ZIP file to your hosting account, the next step is to extract it. This can typically be done within the file manager of your hosting control panel. Locate the uploaded ZIP file, select it, and look for an “Extract” option. Extracting the ZIP file will create a new folder named “wordpress” containing all the necessary WordPress files and directories.
Step 4: Move Files from the WordPress Folder
If you want your WordPress site to be accessible directly from your domain (e.g., yoursite.com), you need to move the files from the “wordpress” folder to the root directory. Inside the file manager, open the “wordpress” folder, select all files and folders, and then move them to the desired location. If you’re installing WordPress in a subdirectory, this step may not be necessary.
Step 5: Create a MySQL Database and User
WordPress requires a MySQL database to store all your site’s content and settings. You can create a new database and user through your hosting control panel. Look for the “MySQL Databases” section and create a new database. Make note of the database name, as you’ll need it later. Next, create a new user and assign it to the database you just created, making sure to grant all privileges to this user. Again, remember to note down the username and password.
Step 6: Configure wp-config.php
Before running the WordPress installation script, you need to connect WordPress to your newly created database. Locate the file named “wp-config-sample.php” in the root directory where you’ve moved the WordPress files. Rename this file to “wp-config.php” and open it for editing. You’ll need to fill in the database details you noted earlier:
Replace ‘database_name_here’ with the name of your database.
Replace ‘username_here’ with your MySQL username.
Replace ‘password_here’ with your MySQL password.
Save the changes once you’ve entered all the necessary information.
Step 7: Run the Installation Script
Now that all the files are in place and the configuration is set, it’s time to run the WordPress installation script. Open your web browser and go to your website. If you’ve placed WordPress in the root directory, simply navigate to your domain (e.g., yoursite.com). If you installed it in a subdirectory, navigate to yoursite.com/subdirectory. The WordPress setup wizard should start, guiding you through the process of setting up your website. You’ll be asked to provide a site title, username, password, and email address. Complete the setup, and voilà, your WordPress site is ready!
Having a reliable and high-speed Virtual Private Server (VPS) is crucial for businesses and individuals alike. For those seeking top-notch VPS solutions in Iraq and the Middle East, look no further than Linkdata.com. Renowned for its cutting-edge technology and exceptional services, Linkdata.com stands out as the go-to provider for fast-speed VPS in the region.
Why Speed Matters in the Digital World:
Before diving into the specifics of Linkdata.com’s VPS offerings, it’s essential to understand why speed is paramount in the digital realm. Whether you’re running a website, hosting applications, or managing databases, a slow server can translate to poor user experiences, decreased productivity, and potential financial losses.
Fast VPS not only ensures quick loading times but also contributes to seamless data transfer, reduced latency, and an overall smoother digital experience. This is particularly vital for businesses relying on online platforms for e-commerce, content delivery, and customer engagement.
Linkdata.com: Setting the Standard for Fast-Speed VPS:
Linkdata.com has emerged as a leader in the Middle East’s VPS market, offering state-of-the-art solutions tailored to meet the diverse needs of businesses and individuals in Iraq. Here are key features that make Linkdata.com stand out:
Linkdata.com employs the latest technology to power its VPS infrastructure. With high-performance servers, advanced networking capabilities, and robust hardware, users can expect optimal speed and reliability.
2. Data Center Presence in the Middle East:
Linkdata.com strategically positions its data centers in the Middle East, including Iraq. This regional presence minimizes latency, ensuring that users accessing VPS services experience lightning-fast speeds for their applications and websites.
3. Scalability for Growing Needs:
Whether you’re a startup with modest requirements or an enterprise with expanding demands, Linkdata.com’s VPS plans are designed to scale effortlessly. This scalability ensures that your server resources align with your evolving needs without compromising speed and performance.
4. User-Friendly Control Panel:
Linkdata.com’s user-friendly control panel simplifies server management, allowing users to optimize settings, monitor performance, and troubleshoot issues easily. This streamlined interface contributes to a hassle-free experience without sacrificing speed.
5. Robust Customer Support:
Linkdata.com takes pride in its dedicated customer support team, ready to assist users with any concerns. A responsive support system ensures that issues are addressed promptly, contributing to the overall reliability of the VPS services.
Getting Started with Linkdata.com:
Obtaining a fast-speed VPS from Linkdata.com is a straightforward process. Follow these steps to unleash the power of high-performance hosting:
Visit Linkdata.com: Head to the official Linkdata.com website to explore their VPS plans and features.
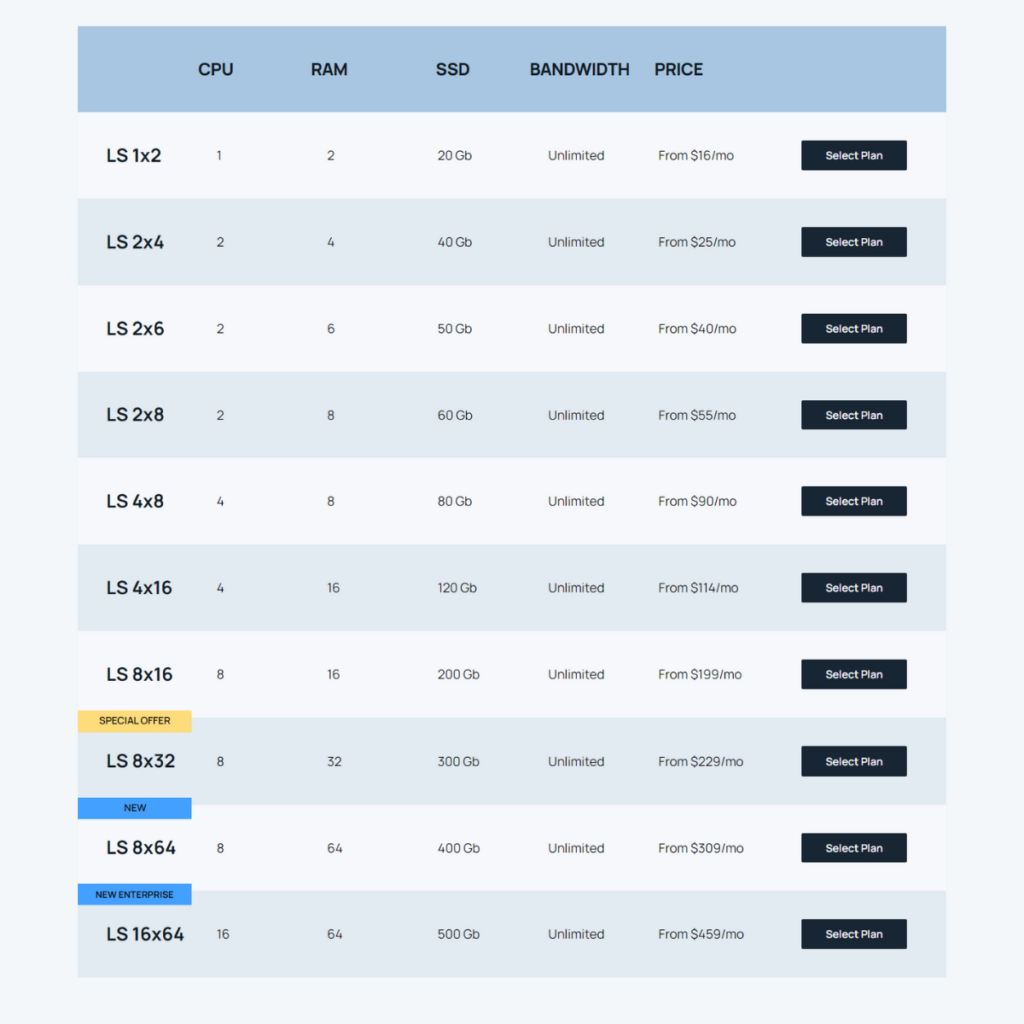
Select Your Plan: Choose a VPS plan that aligns with your requirements. Consider factors such as RAM, storage, and CPU power to ensure optimal performance.
Customize Your Configuration: Tailor your VPS configuration based on your specific needs. Linkdata.com’s customizable options allow you to create a hosting environment that suits your applications.
Complete the Registration: Register for an account on Linkdata.com and complete the necessary details. Verify your identity and payment information to proceed.
Deploy Your VPS: Once your account is set up, deploy your VPS in the data center location of your choice, ensuring low latency and fast speeds for users in Iraq.
Having a fast and reliable VPS is non-negotiable. Linkdata.com’s top-rated VPS services in the Middle East, including Iraq, make it a standout choice for individuals and businesses seeking high-speed hosting solutions. Don’t let a sluggish server hinder your online presence – embrace the power of Linkdata.com for a seamless and lightning-fast VPS experience.
Having a Virtual Private Server (VPS) with a specific Iraqi IP address can significantly impact your online experience. Whether you’re a business owner expanding your market reach or an individual seeking secure and localized internet access, setting up an Iraqi IP VPS through linkdata.com is a straightforward process.
Why Choose an Iraqi IP?
Before we delve into the setup process, let’s understand why having an Iraqi IP is important. An Iraqi IP address allows you to access localized content, enhance your online security, and conduct business operations securely within the country. Now, let’s get started on how to set up your VPS with an Iraqi IP using linkdata.com.
Here’s a step-by-step guide to help you navigate the setup with ease.
Step 1: Visit linkdata.com
Go to linkdata.com: Start by visiting linkdata.com, the reliable platform offering various VPS options, including those with Iraqi IP addresses.
Step 2: Choose Your Iraqi IP VPS Package and Specifications
Select your VPS package: Explore the available VPS packages and choose one that aligns with your specific needs and budget requirements.
Customize your specifications: Tailor your VPS to your preferences by selecting the desired specifications, including CPU power, RAM capacity, and storage space. Verify that your chosen package supports the operating system (OS) of your choice.
Step 3: Select Your Operating System
Choose your OS: Select your preferred operating system for the VPS. Common options include Ubuntu, CentOS, and Debian, all of which are compatible with linkdata.com’s services.
Step 4: Create Your SSH Key
Generate an SSH key pair: Ensure secure access to your VPS by generating an SSH key pair. Linux and macOS users can generate keys using the terminal, while Windows users can use tools like PuTTYgen.
Copy your public key: After generating the SSH key pair, copy the public key. You will need to paste it during the setup process for secure authentication.
Step 5: Check and Add Any Necessary Extras
Review available add-ons: Assess if you require any additional features or add-ons, such as DDoS protection or automated backups. These extras can enhance the security and functionality of your Iraqi IP VPS.
Step 6: Complete the Setup Process
Provide required information: Fill in your details and the necessary information for the setup, including your SSH public key. This key ensures secure and authenticated access to your VPS.
Verify and confirm your order: Double-check all the information you’ve provided, including your chosen specifications and any selected add-ons. Confirm your order to initiate the setup process.
Step 7: Access and Configure Your Iraqi IP VPS
Access your VPS: Upon completion of the setup, you’ll receive access credentials. Utilize your SSH private key to securely access your Iraqi IP VPS.
Configure your VPS: Set up your VPS according to your specific requirements. This may include installing essential software, configuring security settings, and optimizing performance for your intended use.
By following these steps, you can effortlessly establish your Iraqi IP VPS using linkdata.com. This localized and secure VPS empowers you to explore the online world confidently, whether you’re running a business or simply enjoying internet activities tailored to the Iraqi digital landscape. Enjoy your enhanced online experience with your Iraqi IP VPS!
The Internet has become an indispensable part of our lives, and the need for privacy, security, and unrestricted access to information has never been more important. In Iraq, as in many other countries, these needs are often met through the use of a Virtual Private Network (VPN) service.
With varying internet regulations, geo-restrictions, and growing concerns about online privacy, many Iraqis are looking to VPN services to fulfill their online needs. This blog post aims to provide a comprehensive look at the landscape of VPN services in Iraq, highlighting the challenges faced by users and the solutions available.
Why is a VPN Needed in Iraq?
Geo-Restrictions
Many online services and websites restrict content based on the geographic location of the user. Iraqis looking to access international content may encounter these limitations, which a VPN can bypass by changing the apparent location of the user.
Security Concerns
With cyber threats like hacking and data interception on the rise, using a VPN can add an extra layer of security when browsing the internet or conducting online transactions. This is especially useful for those who often use public Wi-Fi networks, which are generally less secure.
Privacy
VPNs can hide your IP address, making your online actions virtually untraceable. For users concerned with privacy, especially those discussing sensitive topics, using a VPN can be a tool for freedom of expression without fear of reprisal.
One of the options available for people in Iraq is LinkData.com, which offers VPN services designed for its clients. With servers located in multiple countries, LinkData.com provides a secure and reliable VPN service that can help Iraqis bypass internet restrictions, maintain online privacy, and secure their data.
Features
High-speed servers for smooth streaming and downloading
AES-256 encryption for maximum security
Multiple server locations to bypass geo-restrictions
User-friendly interface with customer support
Given that LinkData.com also offers a range of IT solutions, their VPN services are well-integrated into a broader ecosystem, offering additional features that can cater to businesses and individual users alike.
Challenges and Risks
Legal Implications
It is essential to note that while using a VPN is generally legal in Iraq, any illegal activity conducted while using a VPN remains unlawful.
Quality of Service
Free VPNs are widely available but are often slow and come with data restrictions. High-quality, paid VPN services like those offered by LinkData.com are generally more reliable and come with customer support.
Reliability
Not all VPNs have servers that work efficiently in Iraq. LinkData.com, however, prides itself on providing a stable and fast connection suitable for various online activities.
Factors to Consider While Choosing a VPN Service in Iraq
Server Locations: The more server locations a VPN service offers, like LinkData.com, the better your chances of bypassing geo-restrictions.
Security Protocols: Look for a VPN provider that offers advanced security features like AES-256 encryption and OpenVPN or WireGuard protocols.
Speed: Connection speed is crucial, especially if you plan on using the VPN for streaming or downloading large files.
Price: While free VPNs are tempting, they often come with limitations. A reasonably priced, reliable VPN like LinkData.com is generally a better option.
User Reviews: Always read reviews or seek recommendations before committing to a VPN service.
How to Set Up a VPN
Choose a Service: After considering all factors, select a VPN service that meets your needs.
Download and Install: Go to the service’s website and download the application. Install it on your device following the prompts.
Connect: Open the application and sign in. Connect to a server location of your choice.
Test: Verify the connection is secure and test the speed to ensure it meets your needs.
Using a VPN in Iraq can help with bypassing geo-restrictions, enhancing online security, and maintaining privacy. While challenges and risks are involved, careful selection and proper setup can help users maximize the benefits offered by VPN services. Providers like LinkData.com offer reliable and feature-rich options that can suit both individual and business needs. Always remember to conduct your own research before making any decisions, as the landscape of online services is continually evolving.
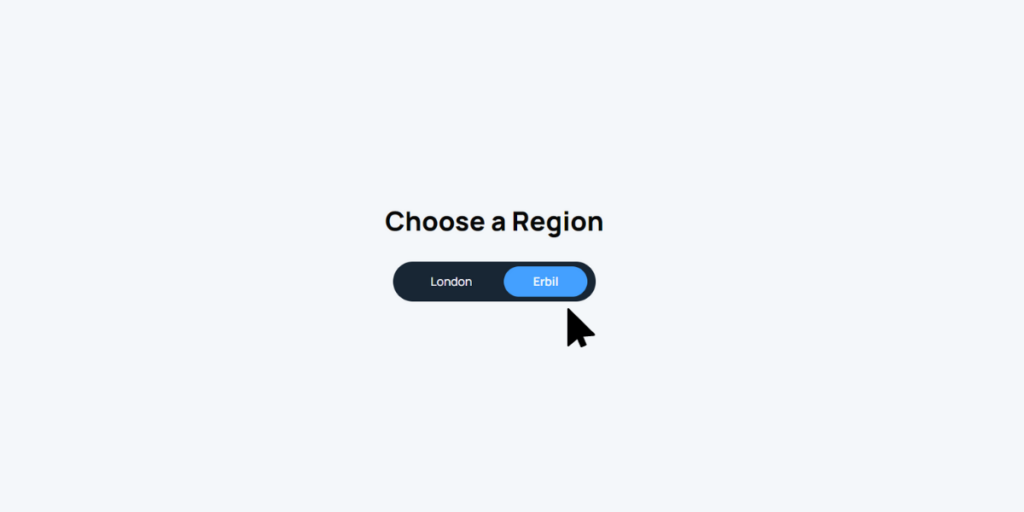
Having a reliable Virtual Private Server (VPS) is essential for businesses, developers, and individuals seeking enhanced performance, security, and control over their online endeavors. Linkdata.com is renowned for its quality VPS services, and in this blog, we will walk you through the process of acquiring a fast Erbil VPS from Linkdata.com.
Why Choose Linkdata.com for Your Erbil VPS Needs? Linkdata.com is a trusted name in the hosting industry, known for its top-notch VPS solutions and excellent customer support. When it comes to Erbil VPS, Linkdata.com stands out for several reasons:
High Performance: Linkdata.com utilizes cutting-edge hardware and networking equipment, ensuring that your VPS operates at peak performance levels. This is crucial for applications that demand fast processing speeds and low latency.
Reliability: With a 99.9% uptime guarantee, you can trust Linkdata.com to keep your VPS online and accessible to your users around the clock.
Security: Linkdata.com implements robust security measures to safeguard your data and applications. This includes firewall protection, regular security audits, and DDoS mitigation.
Scalability: As your needs grow, Linkdata.com allows you to easily scale your Erbil VPS resources to accommodate increased traffic and demands without interruption.
Global Data Centers: With data centers strategically located around the world, Linkdata.com ensures that your VPS is hosted in a location that optimizes performance and minimizes latency for your target audience.
Now, let’s dive into the steps of acquiring your very own Fast Erbil VPS from Linkdata.com:
Step 1: Visit the Linkdata.com Website Head over to Linkdata.com using your preferred web browser. The website is user-friendly and designed to help you easily navigate through their services.
Step 2: Choose Your Erbil VPS Plan Explore the range of Erbil VPS plans available on Linkdata.com. These plans vary in terms of resources, such as CPU, RAM, storage, and bandwidth. Select the plan that aligns with your performance requirements and budget.
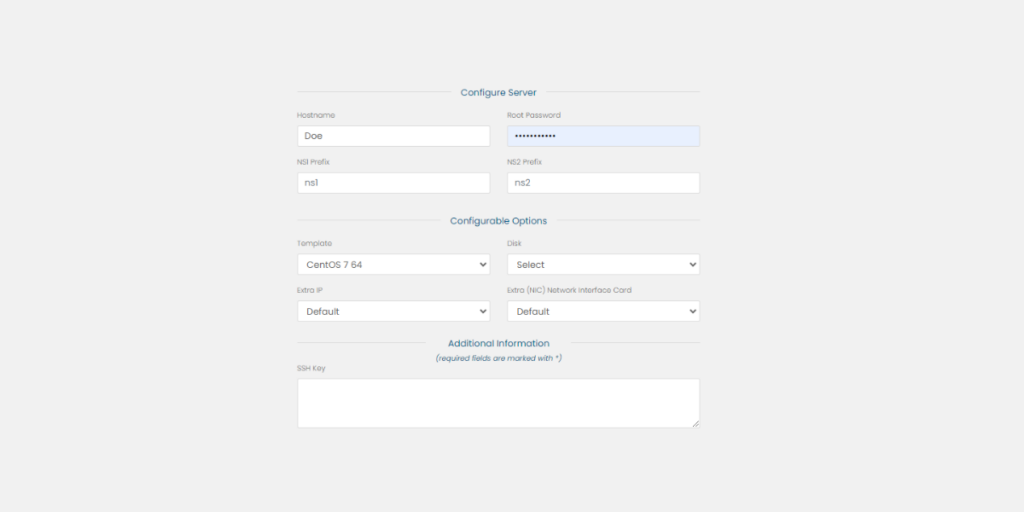
Step 3: Customize Your VPS Configuration Once you’ve chosen a plan, you can further customize your Erbil VPS by selecting additional options like operating system, control panel, and any additional services you may require.
Step 4: Review and Checkout Before proceeding, review your selected VPS configuration to ensure accuracy. Take a moment to double-check your chosen plan, configuration options, and any extras you’ve added.
Step 5: Create an Account If you’re a new customer, you’ll need to create an account with Linkdata.com. This account will allow you to manage your VPS services, billing, and support requests.
Step 6: Complete Payment Proceed to the payment section and provide the necessary payment information. Linkdata.com offers various payment methods for your convenience.
Step 7: Deploy Your Erbil VPS After completing the payment, Linkdata.com will initiate the setup process for your Erbil VPS. This generally takes a short amount of time, and you will receive notifications once your VPS is ready for use.
Step 8: Access and Configure Your VPS Once your VPS is ready, you will receive the necessary login credentials. Use these credentials to access your VPS via SSH or a control panel. From here, you can install your preferred applications, configure settings, and start using your VPS.
Acquiring a fast Erbil VPS from Linkdata.com is a straightforward process that provides you with a powerful hosting solution for your projects. With their reliable performance, security measures, and user-friendly interface, Linkdata.com makes it easy to launch and manage your VPS effectively. Whether you’re a developer, business owner, or individual, investing in a quality VPS can greatly enhance your online presence and capabilities.
Are you a developer in Erbil looking for the perfect hosting solution for your Express.js application? In this blog, we will explore the benefits of hosting Express.js applications in Erbil with LinkData.com‘s optimized VPS (Virtual Private Server). Whether you’re a seasoned developer or just starting with Express.js, this hosting option offers the reliability, performance, and scalability you need to bring your web application to life.
What is Express.js? Before we delve into the hosting aspect, let’s briefly touch on Express.js. Express.js is a powerful, flexible, and minimalist web application framework for Node.js. It simplifies the process of building web applications and APIs by providing a robust set of features and middleware. Express.js is widely popular for its speed and scalability, making it a top choice for developers worldwide.
The Need for Optimized VPS Hosting: When hosting an Express.js application, having a reliable and high-performance server infrastructure is critical for ensuring seamless user experiences and handling traffic spikes. A Virtual Private Server (VPS) offers a dedicated environment with allocated resources, allowing you to have more control over your hosting environment and avoid the pitfalls of shared hosting.
Why Choose LinkData.com Optimized VPS? LinkData.com is a leading hosting provider that offers tailored solutions for developers, businesses, and startups in Erbil. Their Optimized VPS for Express.js comes with a range of features designed to enhance performance and ease of use.
Blazing-Fast Performance: LinkData.com’s VPS is built with high-performance SSD storage and powerful CPUs, ensuring your Express.js application runs smoothly and loads quickly for users.
Customization: With full root access to your VPS, you have the freedom to customize the server environment according to your specific requirements. This level of control is perfect for developers who need to install specific software and libraries.
Security: LinkData.com takes security seriously, implementing robust measures to safeguard your data and protect your application from potential threats. Their VPS infrastructure is equipped with firewalls and regular security updates.
Scalability: As your Express.js application grows, you may need to scale your resources. LinkData.com makes it easy to upgrade your VPS to handle increased traffic and demands.
24/7 Support: Technical issues can arise at any time, and LinkData.com understands the importance of responsive customer support. Their team of experts is available 24/7 to assist you with any hosting-related concerns.
Getting Started with LinkData.com Optimized VPS for Express.js: Setting up your Express.js application on LinkData.com’s Optimized VPS is a straightforward process:
Step 1: Sign Up – Create an account on LinkData.com and choose the Optimized VPS plan that suits your needs.
Step 2: Configure Your VPS – Once you’ve signed up, you can configure your VPS with your preferred operating system, server resources, and additional software.
Step 3: Deployment – Upload your Express.js application code to the VPS using SSH or any preferred deployment method.
Step 4: Domain Setup – Connect your domain to your VPS IP address to make your Express.js application accessible to users.
Step 5: Monitor and Scale – Keep an eye on your application’s performance and scale your resources as needed to accommodate growing traffic.
Hosting your Express.js application in Erbil with LinkData.com’s Optimized VPS is a smart choice for developers seeking top-notch performance, security, and scalability. With a robust infrastructure and reliable support, LinkData.com ensures that your web application runs flawlessly, allowing you to focus on what matters most: building innovative web experiences. So, take the leap and experience the power of Express.js hosting on LinkData.com today!
Ember Hosting in Erbil – Erbil, a thriving city with a growing tech-savvy community, is witnessing a surge in web development projects. In this dynamic landscape, choosing the right hosting environment is crucial for unleashing the full potential of frameworks like Ember.js. In this blog, we’ll explore the benefits of Ember hosting in Erbil and how LinkData.com VPS is the perfect partner to host and optimize Ember.js applications in this vibrant city.
Ember.js has become a driving force in the web development community, enabling developers to create feature-rich and scalable web applications. Its strong architecture and efficient tools provide a seamless development experience and foster collaboration among team members. For businesses and startups in Erbil looking to build ambitious web apps, Ember.js emerges as a compelling choice.
Key Benefits of Ember.js in Erbil:
Rapid Development: Ember.js embraces convention over configuration, empowering developers in Erbil to build applications quickly and efficiently. This approach ensures standardized project structures and reduces boilerplate code, allowing teams to focus on building innovative features.
Modular Components: Ember.js leverages Handlebars templating to create reusable components, promoting a modular approach to development. With the ability to encapsulate functionalities, developers in Erbil can easily maintain and scale applications as they grow.
URL Routing: Single Page Applications (SPAs) are becoming increasingly popular due to their seamless navigation and bookmarkable URLs. Ember.js comes with a robust router, enabling developers to define URL routes, enhancing the user experience.
Data Management: Ember Data, an integral part of the Ember.js ecosystem, simplifies data management by handling communication between the frontend and backend. This feature streamlines data organization and ensures consistency across the application.
LinkData.com VPS: Optimized Ember Hosting in Erbil
As the demand for powerful hosting solutions grows in Erbil, LinkData.com VPS steps up to the plate as a reliable and efficient hosting provider for Ember.js applications. Here’s why LinkData.com VPS is the optimal choice for Ember hosting in Erbil:
Local Presence: LinkData.com VPS has a strong local presence in Erbil, offering low-latency connections that result in faster loading times for Ember.js applications. This ensures an enhanced user experience and improved search engine rankings.
Performance-Driven Infrastructure: LinkData.com VPS’s high-performance infrastructure, featuring state-of-the-art SSD storage and powerful processors, ensures lightning-fast response times for Ember.js apps, even during peak traffic periods.
Scalability and Flexibility: With the capability to handle a range of workloads, LinkData.com VPS empowers businesses in Erbil to scale their Ember.js applications effortlessly as their user base expands.
24/7 Support: In a competitive web development landscape, every minute counts. LinkData.com VPS provides round-the-clock customer support, ensuring that any technical issues or queries are promptly addressed, minimizing downtime.
Ember.js, with its robust features and convention-driven approach, serves as a formidable framework for web development projects in Erbil. By leveraging the optimized hosting environment provided by LinkData.com VPS, businesses and developers can unlock the full potential of their Ember.js applications.
As Erbil’s tech ecosystem continues to flourish, the partnership between Ember.js and LinkData.com VPS is poised to redefine web application development in the region. So, if you’re a web developer or a business in Erbil with aspirations for creating exceptional web apps, embrace Ember hosting with LinkData.com VPS and witness your ideas transform into reality.
Ember.js hosting service is not available on shared hosting environment
Are you looking to host your Flask hosting in Erbil, the capital city of the Kurdistan Region in Iraq?In this comprehensive guide, we will explore the process of hosting Flask hosting in Erbil, with a particular focus on utilizing the services of LinkData.com. LinkData.com is a renowned hosting provider that offers reliable and secure infrastructure for deploying Flask hosting in Erbil. Let’s dive in and discover how you can get your Flask app up and running in no time!
Before we delve into the hosting process, let’s briefly understand what Flask is. Flask is a lightweight and versatile web framework for Python that allows developers to build web applications easily. It provides a simple and intuitive interface while offering the flexibility to create small to large-scale applications.
Why Choose LinkData.com?
LinkData.com is an ideal hosting provider for Flask applications in Erbil due to its numerous advantages:
a. Reliable Infrastructure: LinkData.com ensures high uptime and availability for your applications, minimizing any potential downtime.
b. Scalability: As your Flask application grows, LinkData.com offers seamless scalability options to accommodate increased traffic and user demand.
c. Security: LinkData.com prioritizes the security of your applications, providing robust measures to protect against potential threats and vulnerabilities.
d. Support: Their dedicated support team is available round the clock to assist you with any technical issues or inquiries that may arise during the hosting process.
Getting Started with LinkData.com:
To begin hosting your Flask application on LinkData.com, follow these steps:
a. Sign up: Visit the LinkData.com website and create an account. Provide the required details, including your name, email address, and desired subscription plan.
b. Choose a Plan: LinkData.com offers various hosting plans tailored to different needs. Select a plan that aligns with your application’s requirements and budget.
c. Create a Virtual Environment: Before deploying your Flask application, it is recommended to create a virtual environment to isolate dependencies. This ensures a clean and consistent environment for your application to run smoothly.
d. Prepare your Flask App: Ensure that your Flask application is properly configured and runs without errors on your local machine. Double-check dependencies and configurations to avoid any issues during deployment.
Deploying your Flask Application:
Now that you have your LinkData.com account set up and your Flask application ready, it’s time to deploy:
a. Connect via SSH: Access your LinkData.com account and connect to your server via Secure Shell (SSH) using a tool like PuTTY or the built-in terminal.
b. Install Dependencies: Set up the necessary dependencies and libraries required by your Flask application on the server.
c. Upload your Flask App: Use secure file transfer methods such as SCP or SFTP to upload your Flask application files to the server.
d. Configure the Server: Set up the appropriate server configurations to ensure your Flask application runs smoothly. Configure environment variables, ports, and other settings as needed.
e. Start the Application: Launch your Flask application on the server using the appropriate command, such as python app.py. Verify that your application is running without any errors.
Managing and Scaling your Flask App:
Once your Flask application is successfully deployed, you may need to manage and scale it based on your requirements:
a. Monitoring and Logging: Utilize monitoring tools and log aggregators to keep track of your application’s performance, identify potential issues, and ensure smooth operation.
b. Autoscaling: LinkData.com offers autoscaling capabilities, allowing your application to handle increased traffic and adjust resources accordingly.
c. Database Integration: If your Flask application requires database functionality, LinkData.com provides options to integrate with various database systems, ensuring efficient data management.
Hosting Flask applications in Erbil, Iraq, has never been easier with LinkData.com. Their reliable infrastructure, scalable options, and strong security measures make them an excellent choice for developers. By following the steps outlined in this guide, you can deploy your Flask application and take advantage of the vast possibilities of web development in Erbil. Start building and hosting your Flask applications with LinkData.com today and unlock the potential of your ideas!
Remember, hosting your Flask application with LinkData.com offers a solid foundation, allowing you to focus on what matters most: developing your application and providing an excellent user experience.
Looking to host your AngularJS project in Erbil? In this step-by-step guide, we’ll walk you through the process of hosting your AngularJS application in Erbil. Whether you’re a developer, business owner, or aspiring entrepreneur, this guide will help you set up your AngularJS application for success in the vibrant city of Erbil.
Step 1: Sign up for a hosting plan on Linkdata.com Begin by visiting the Linkdata.com website and signing up for an account. Choose a hosting plan that aligns with your requirements and supports AngularJS applications.
Step 2: Create a new project After logging in to your Linkdata.com account, navigate to the dashboard. Create a new website. Provide a suitable name for your project and select AngularJS as the framework or technology.
Step 3: Set up the project environment Within the Linkdata.com dashboard, you will likely find a control panel or settings section where you can configure your project’s environment. Adjust the AngularJS version, Node.js version, or any other dependencies required for your project.
Step 4: Upload your AngularJS files Once the project environment is set up, it’s time to upload your AngularJS application files. Linkdata.com typically provides an FTP client or a file manager for this purpose. Connect to your hosting space and upload all the necessary files and folders of your AngularJS application.
Step 5: Configure the server To ensure your AngularJS application runs smoothly, you may need to configure the server settings. This could involve setting up routing rules, enabling HTML5 mode, or specifying the entry point for your application.
Step 6: Install dependencies If your AngularJS application relies on external dependencies or packages, you’ll need to install them. Linkdata.com may offer a package manager or command-line interface to install Node.js packages. Use the provided commands to install the necessary dependencies.
Step 7: Test your application With everything set up, it’s time to test your AngularJS application. Open a web browser and enter the URL of your hosted application. Verify that your application loads correctly and that all functionalities work as intended. Test different pages and features to ensure everything is functioning as expected.
Step 8: Configure domain and DNS settings To use a custom domain for your AngularJS application, you’ll need to configure the domain and DNS settings. Linkdata.com provides a dashboard and documentation on how to map your domain to the hosted application. Follow their guidelines to set up the necessary DNS records.
Step 9: Deploy your application Once you’ve thoroughly tested your AngularJS application, it’s time to deploy it. Linkdata.com may offer a deploy or publish option within their dashboard or provide instructions on how to deploy your application. Follow their guidelines to make your application live.
Step 10: Monitor and maintain your application After deployment, it’s crucial to regularly monitor your application for any issues or updates. Linkdata.com may provide monitoring tools or suggest external monitoring services. Additionally, stay proactive by keeping your AngularJS framework and dependencies up to date to benefit from security patches and new features.
Hosting your AngularJS application in Erbil with Linkdata.com is a straightforward process. By following the steps outlined in this guide, you can ensure a smooth and successful hosting experience. Remember to consult the documentation and support provided by Linkdata.com for specific instructions and guidelines. Now, you’re ready to showcase your AngularJS application to the world with the power of Linkdata.com!